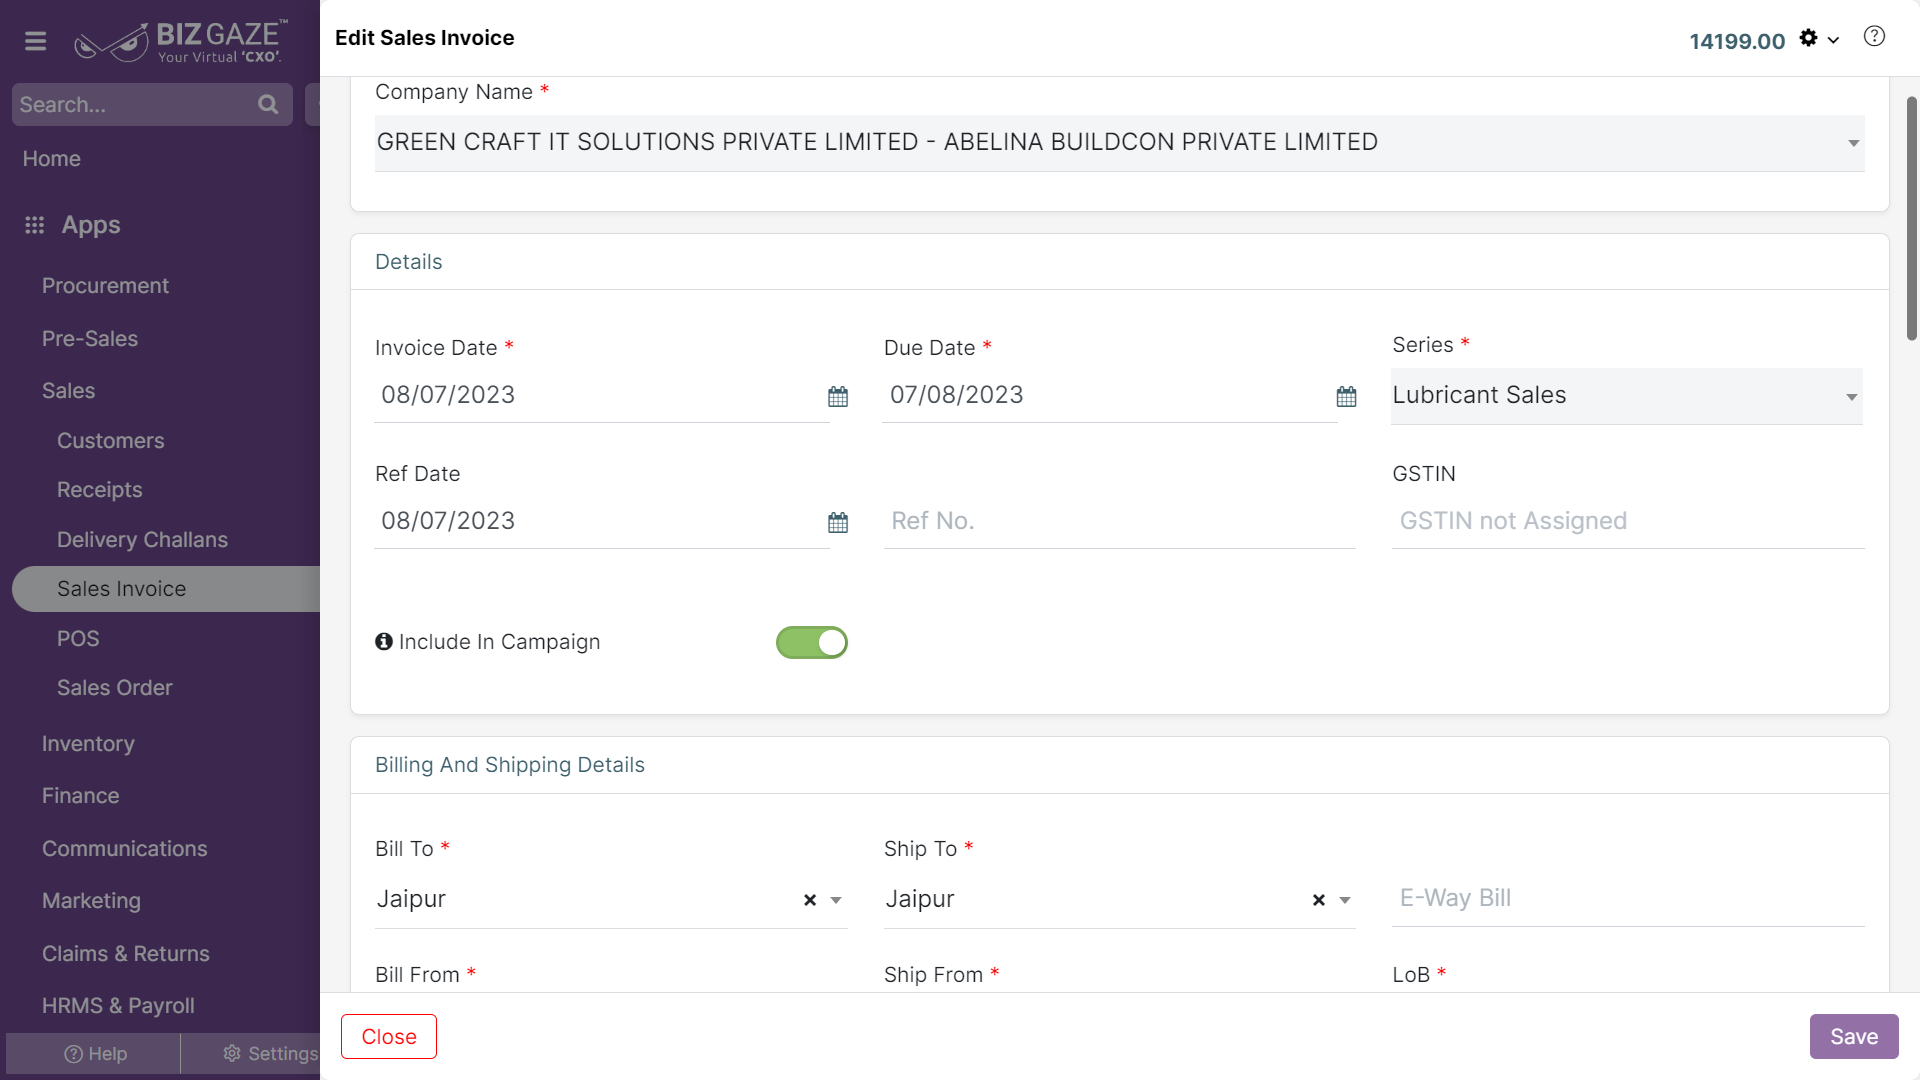
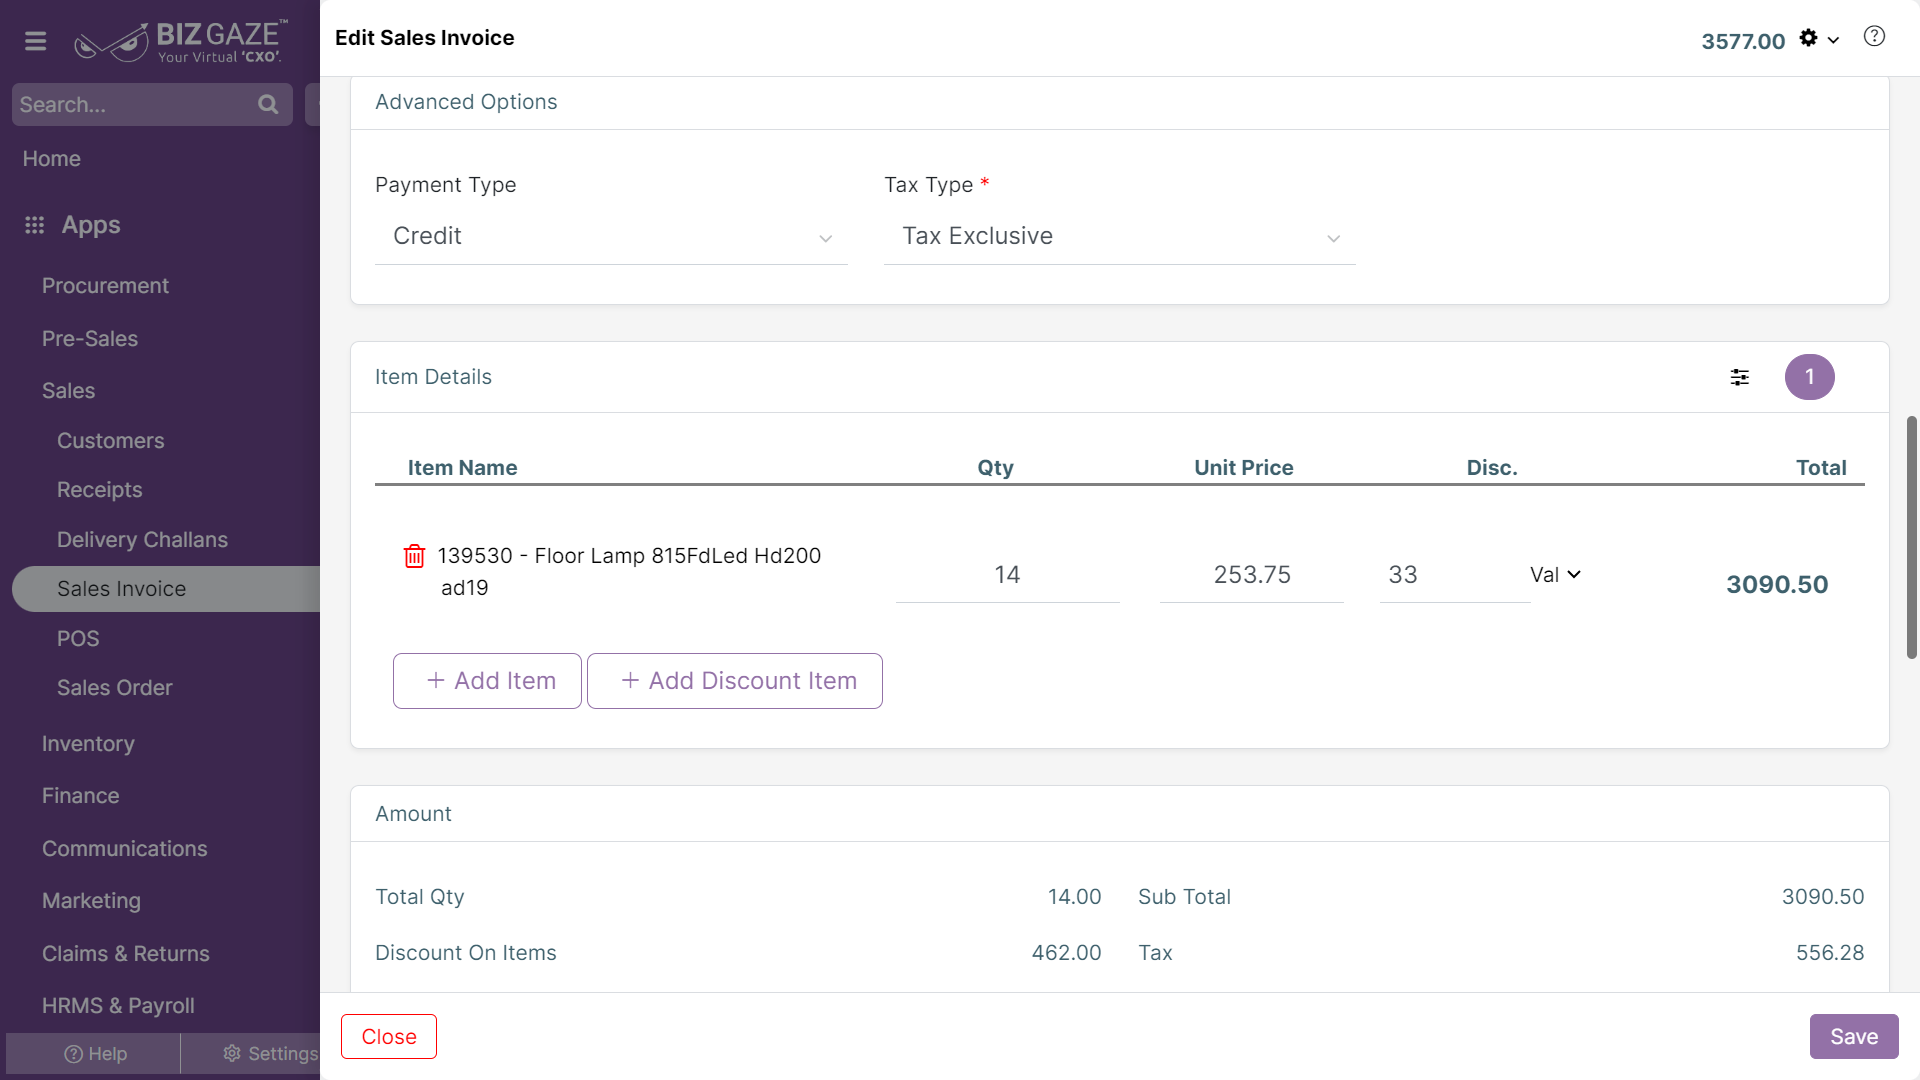
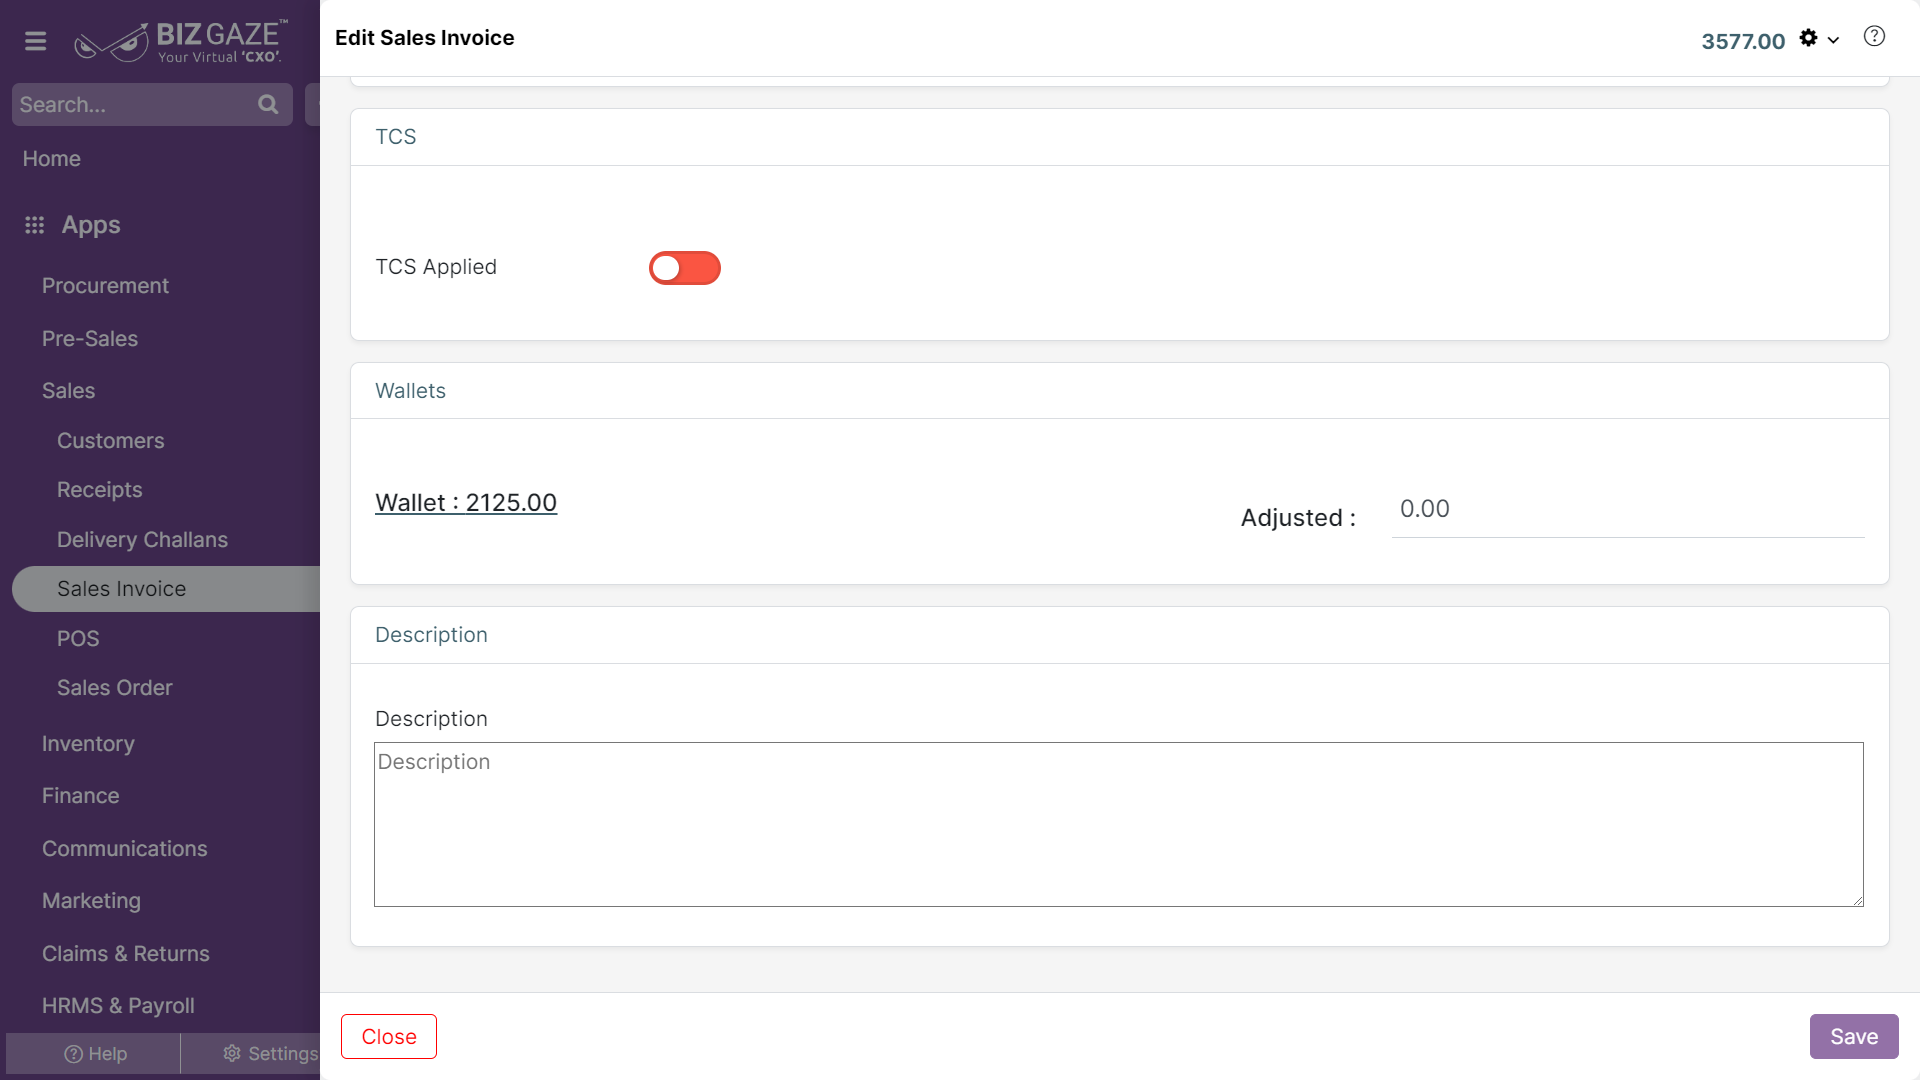
The update process of Sales Invoice is as follows:
Navigation: Menu > Sales Invoice App > Listview > Select the Invoice > Edit (Pencil Icon)
If user wants to update the already existing Sales Invoice details, user needs to click on ‘Edit’ option at the top right corner and fill in the required details.
Note: The basic details will load automatically with reference to the Sales Order
| Field Name | Description |
| Company name | System automatically loads company name by default, if user wants to change company name select a new company name in the field |
| Details | |
| Invoice date | System automatically loads Invoice date of the order and if user wants to change it, set a new date from the calendar to apply |
| Due date | System automatically shows the due date for payment, if user wants to change it, set a new due date from the calendar |
| Series | By default system shows series as Sales Invoice, if user wants to change the series, select a series name from the list |
| Ref Date | System automatically shows the reference date of invoice, if user wants to change it, set a reference date from the calendar |
| Ref no. | System automatically shows the reference number of Invoice, if user wants to change it, enter a reference number for the Invoice |
| GSTIN | By default system loads GSTIN number of the customer that was provided while Sales Invoice creation |
| Include in Campaign | By default system shows whether the Toggle is enabled or not. If user wants to assign or remove the Include in campaign option, click on the toggle. Toggle turns to green in color when enabled and red in color when disabled |
Edit Billing And Shipping Details
| Field Name | Description |
| Bill From | By default system shows the existing Bill from address and if user wants to change the existing address, select a Bill from address for the seller |
| Bill To | By default system shows the existing Bill To address and if user wants to change the existing address, select a new Bill To address of the buyer |
| Ship From | By default system shows the existing Ship from address and if user wants to change the address, select a Ship from address for the seller |
| Ship To | By default system shows the existing Ship To address and if user wants to change the address, select a new Ship To address of the buyer |
| Waybill no. | System automatically shows Waybill number of the order and if user wants to change it, enter a new Waybill number for the order |
| LoB | By default system shows LoB segment of the customer and if user wants to change the existing LoB segment, click on the checkbox to select |
| Sales Person | By default system shows Sales person name for the customer and if user wants to change the sales person, select new name from the list |
Edit Payment Term
| Payment Term | By default the system shows Payment term allotted for the invoice and if user wants to change it, select a new Payment term from the list |
More Options : For advanced options about the order, user can click on More options.
| Payment Type | By default system shows Payment type allotted for the order and if user wants to change it, select a new Payment type from the list |
| Tax Type | By default system shows Tax type allotted for the order as it is inclusive or exclusive and if user wants to change it, select a Tax type from the list |
| Conversion Rate | By default system takes conversion rate for the payment type and if user wants to change it, enter a new rate in the field |
Items
User can click on ‘Add items’ button to add new items & shows the labels of item details. User can add Multiple items and enter the quantity.
| Field name | Description |
| Tax group | System automatically loads Tax group name applied, and if user wants to change the Tax group, select a new Tax group from the list |
| Item details / Unit Price | System automatically loads item details of the order and if user wants to change Unit price of the item, click on Price displayed below Item name and update the unit price and discount value of the item |
| Quantity | System automatically shows Quantity of the order items and if user wants to change it, enter a new quantity in number or click on ‘+’ or ‘-’ to increase or decrease quantity respectively to the current quantity |
| Discount | System automatically loads the discount added and discount type of the order, if user wants to change it, enter a discount value and select discount type (value or percentage) from the list |
| Account | System automatically loads Account name of the order, and if user wants to change it, select a new account name from the list |
| Description | User can comment or enter short notes about the Item details |
| Field name | Description |
| Tax Group | System automatically loads Tax group name applied, and if user wants to change the Tax group, select a new Tax group from the list |
| Account | System automatically loads Account name of the order, and if user wants to change it, select a new account name from the list |
Amount
| Field Name | Description |
| Adjustment | System automatically loads adjustment of the amount from wallet and if user wants to change it, click on the checkbox to allow/remove adjustment |
| Add Coupon Item | User needs to click on the ‘Add Coupon’ option to add a new coupon item in the Sales Invoice |
| Add Expense Item | User needs to click on the ‘Add Expense’ option to add a new Expense item in the Sales Invoice |
| Account | System automatically loads Account name of the order, and if user wants to change it, select a new account name from the list |
| Description | User can comment or enter short notes about the discount and price details |
| Field Name | Description |
| Add Item | User needs to click on the ‘Add Item’ option to add a new item in the Sales Invoice |
| Add Discount Item | User needs to click on the ‘Add Discount Item’ option to add a new discount item in the Sales Invoice |
| Discount | System automatically loads the discount added and discount type of the order, if user wants to change it, enter a discount value and select discount type (value or percentage) from the list |
| Delete Item | User needs to click on the delete option icon besides the item name and you can see a pop up notification for final confirmation. Click on ‘OK’ and the item will be deleted. |
| Wallets | |
| Adjusted | System automatically loads remaining and adjusted amount of the Wallet and if user wants to change it, enter a new value to adjust wallet amount |
| TCS Applied | By default system shows whether the Toggle is enabled or not. If user wants to enable or disable TCS contacts, click on the toggle. Toggle turns to green in color when enabled and red in color when disabled |
Apply all the details and click on Save.
Updates in Details Portlet
The process to update Order number, DC number and Sales person name in Details Widget is as follows:
Navigation: Menu > Sales Invoice App > Listview > Select the Invoice > Details Portlet > Details Widget
Order Number
If user wants to update the existing Order number, user needs to click on Order number displayed which directs user to Sales Order module where user can update existing details.
DC number
The process to update DC number in Details Widget is as follows:
Navigation: Menu > Sales Invoice App > Listview > Select the Invoice > Details Portlet > Details Widget > Click on DC no.
If user wants to update the already existing DC number, user needs to click on DC number displayed which directs to ‘Edit DC’ module where user can update existing details.
The process to update Sales person in Details Widget is as follows:
Navigation: Menu > Sales Invoice App > Listview > Select the Invoice > Details Portlet > Details Widget > Click on Sales Person name
Edit Sales Person Name
By default system shows Sales person name for the customer and if user wants to change the sales person, click on the Sales person name that directs to ‘Change Invoice Sales Person’ page then select a new sales person name from the list and click on Save.
Update Organization Name
User needs to click on the Order Number in Details Portlet which navigates to Sales Order module. Click on the ‘Edit’ option (Pencil Icon) and it navigate to ‘Edit Sales order Module’, then click on the ‘X’ option and select a new Organization name from the drop-down list.
Updates in Transactions Portlet
The process to update DC number in Connect DC Widget is as follows:
Navigation: Menu > Sales Invoice App > Listview > Select the Invoice > Transactions Portlet > Connect DC Widget > Click on DC number
By default system shows DC number of the invoice and if user wants to change it, click on the DC number that directs to ‘Connect DC’ page then select a new DC number from the list and click on Save.
Updates in E-Invoice Portlet
The process to update Invoice type in GST Invoice type details Widget is as follows:
Navigation: Menu > Sales Invoice App > Listview > Select the Invoice > E-Invoice Portlet > GST Invoice type details Widget > Edit (Three dots)
By default system shows Invoice type and if user wants to change it, click on the edit option and select Invoice type from the drop-down list.
Apply the details and click on Save.
User needs to click on the current stage option at the top right corner of the Sales Invoice and select “Void” option from the following options visible.
User needs to select the required Sales Order and go to Invoices Widget in ‘Transactions’ portlet. It will navigate to ‘Confirm Invoice Details’ page, where user needs to select the required template and click on “Confirm and Print” option.


