The creation process of Lead is as follows:
Navigation: Menu > Leads App > Listview > Create (+)
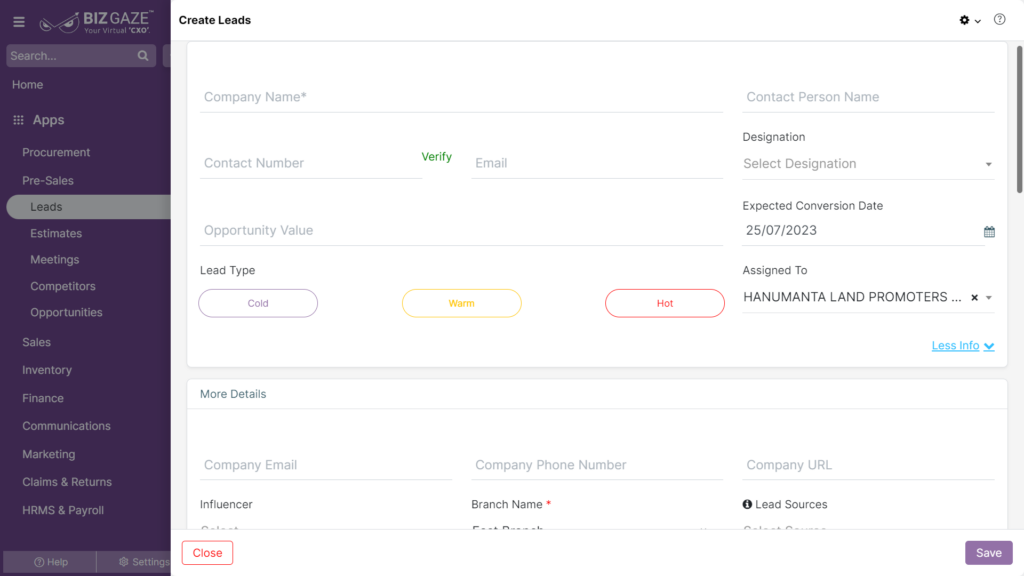
If user wants to create the Lead, click on Create Option (+ Plus Symbol) option at the top right corner and fill in the required details.
Note: Star Marked (*) fields are mandatory!
Create Leads
| Field name | Description | Mandatory |
| Company Name | Enter the name of the company | Yes |
| Contact Person | Enter the name of Point of Contact Person in the field | Yes |
| Contact Number | Enter the Mobile number of the Lead | Yes |
| Verify: User can click on verify and enter the OTP sent to the registered mobile number | ||
| Enter the Mail Id of the Lead | No | |
| Designation | Select the designation of the Contact Person from the list | Yes |
| Opportunity Value | Enter the Opportunity Value of the Lead | No |
| Expected Conversion Date | Set an expected date of the Lead conversion to a potential customer from the calendar | No |
| Lead Type | Select the Lead Type from the below options (Cold, Warm, Hot) | No |
| Source Details | ||
| Sources | Select the source of the Lead from the drop-down list | No |
| Industry | Select an industry of the lead from the drop-down list | Yes |
| Assigned To | Select a name from the drop-down list to assign the Lead | Yes |
| More Options : For Advanced options about the Lead, user can click on More options | ||
| Company Phone Number |
Enter the Mobile number of the Lead’s company Verify: User can click on verify and enter the OTP sent to the registered mobile number |
Yes |
| Company Email | Enter the Mail Id of the Lead’s Company | Yes |
| URL | Enter the URL of the Lead’s Company | Yes |
| Influencer | Select the Influencer name from the list to assign the Lead | No |
| Branch Name | Select the branch name of the company from the list | Yes |
| Series | By default the system takes the Series as Leads | Yes |
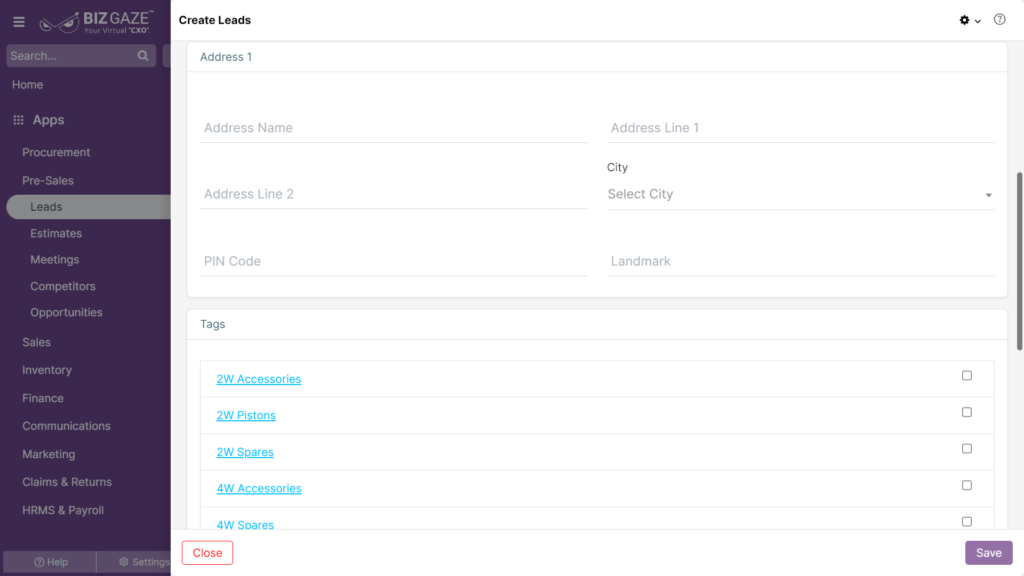
| Address | ||
| Address Name | Enter the address name of the company in the field | Yes |
| Pin Code | Enter the Pin Code of the address in the field | No |
| Address line 1 & 2 | Enter the address line 1 & 2 details in the field | Yes |
| City | Enter the City name in the field | Yes |
| Landmark | Enter the landmark details in the field | No |
| Description | User can comment or enter short notes about the Lead | No |
| Tags | Select by clicking on the checkbox against the LoB Tags to assign for the Lead | Yes |
Apply all the details and click on Save.