The creation process of the Professional Tax Component
Navigation: Menu > Apps > Search for the Statutory Components app > Listview > Select the Component Name (Professional Tax) > Click on Create (+)
User can click on “+” button in Professional Tax Widget to add new Professional Tax component & it shows the labels of creation.
Note: The fields which are in star mark are mandatory in the creation screen
Create Professional Tax
| Field name | Description | Mandatory |
| Work Location Name | Select the work location name from the drop-down list | Yes |
| PT Number | Enter the PT Number (Professional Tax number) of the employee | Yes |
| Deduction Cycle | The system automatically takes deduction cycle as Monthly | – |
| Start Range (₹) | Enter the monetary value of the salary’s start range | Yes |
| End Range (₹) | Enter the monetary value of the salary’s end range | Yes |
| Monthly Tax Amount (₹) | Enter the monetary value of the monthly tax amount | Yes |
| Add | User needs to click on ‘Add’ option and click on save to save the Professional Tax details | Yes |
Edit Professional Tax
The process to Edit the Professional Tax component is as follows:
Navigation: Menu > Apps > Search for the Statutory Components app > Select the Component Name (Professional Tax) > Edit (Pencil Icon)
If user wants to update the existing Professional Tax details, click on the ‘Edit’ (Pencil Icon) option and fill in the required details.
Edit Statutory Components
| Field name | Description |
| Setting Name | By default the system takes setting name as Professional Tax |
Apply the required changes and click on Save.
Edit Labor Welfare Fund
The process to Edit the Labor Welfare Fund component is as follows:
Navigation: Menu > Apps > Search for the Statutory Components app > Select the Component Name (Labour Welfare Fund) > Edit (Pencil Icon)
If user wants to update the existing Labor Welfare Fund details, click on the ‘Edit’ (Pencil Icon) option and fill in the required details.
Edit Statutory Components
| Field name | Description |
| Setting Name | By default the system takes setting name as Labor Welfare Fund |
| Employees Provident Fund | |
| Deduction Cycle | The system automatically takes deduction cycle as Monthly |
| Employees’ Contribution | The system automatically takes the existing Employees’ Contribution |
| Employer’s Contribution | The system automatically takes the existing Employer’s Contribution |
Apply the required changes and click on Save.
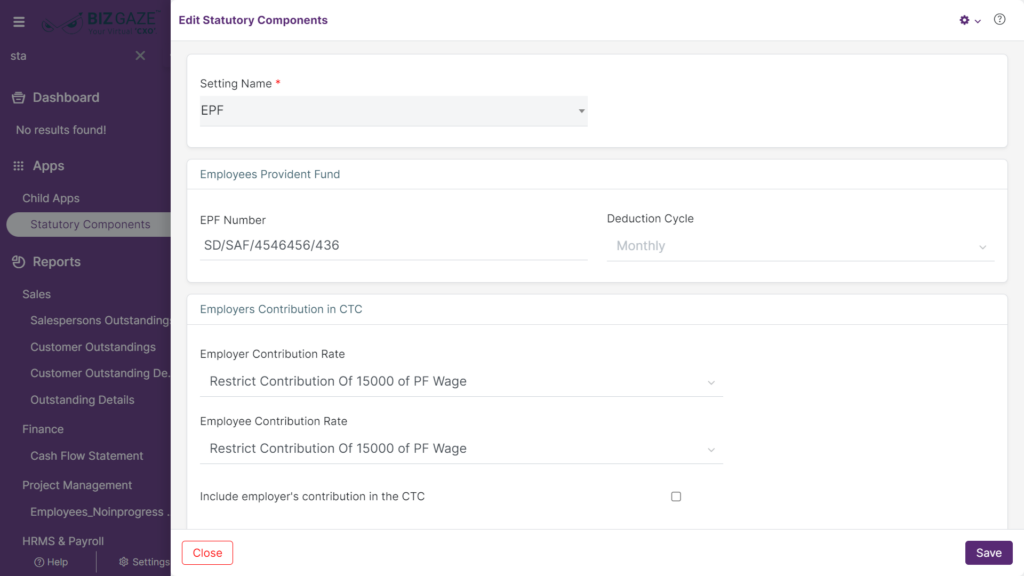
Edit Employees Provident Fund
The process to Edit the Employees Provident Fund component is as follows:
Navigation: Menu > Apps > Search for the Statutory Components app > Select the Component Name (Employees Provident Fund) > Edit (Pencil Icon)
If user wants to update the existing Employees Provident Fund details, click on the ‘Edit’ (Pencil Icon) option and fill in the required details.
Edit Statutory Components
| Field name | Description |
| Setting Name | By default the system takes setting name as Employees Provident Fund |
| Employees Provident Fund | |
| EPF Number | Enter the EPF (Employees Provident Fund) number of the employee |
| Deduction Cycle | The system automatically takes deduction cycle as Monthly |
| Employees’ Contribution in CTC | |
| Employer Contribution Rate | By default the system displays existing Employer Contribution Rate in CTC; if user wants to change it, select the Employer Contribution Rate from the drop-down list |
| Employee Contribution Rate | By default the system displays existing Employee Contribution Rate in CTC; if user wants to change it, select the Employee Contribution Rate from the drop-down list |
| Include employer’s contribution in the CTC | By default the system displays whether the ‘Include employer’s contribution in the CTC; setting is enabled or not; if user wants to change it, click on the checkbox to enable/disable |
| Override PF contribution rate at employee level | By default the system displays whether the ‘Override PF contribution rate at employee level’ setting is enable or not; if user wants to change it, click on the checkbox to enable/disable |
PF Configuration when LOP Applied
| Field name | Description |
| Pro-rate Restricted PF Wage | By default the system displays whether the ‘Pro-rate Restricted PF Wage’ setting is enable or not; if user wants to change it, click on the checkbox to enable/disable |
| Consider all applicable PF components if PF wage is less than 15k after Loss of Pay | By default the system displays whether the ‘Consider all applicable PF components if PF wage is less than 15k after Loss of Pay’ setting is enable or not; if user wants to change it, click on the checkbox to enable/disable |
Apply the required changes and click on Save.
Edit Employees State Insurance
The process to Edit the Employees State Insurance component is as follows:
Navigation: Menu > Apps > Search for the Statutory Components app > Select the Component Name (Employees State Insurance) > Edit (Pencil Icon)
If user wants to update the existing Employees State Insurance details, click on the ‘Edit’ (Pencil Icon) option and fill in the required details.
Edit Statutory Components
| Field name | Description |
| Setting Name | By default the system takes setting name as Employees State Insurance |
| Employees State Insurance | |
| ESI Number | Enter the ESI (Employees State Insurance Fund) number of the employee |
| Deduction Cycle | The system automatically takes deduction cycle as Monthly |
| Employees’ Contribution | The system automatically takes the existing Employees’ Contribution |
| Employer’s Contribution | The system automatically takes the existing Employer’s Contribution |
| Employers Contribution in CTC | |
| Include employer’s contribution in the CTC | By default the system displays whether the ‘Include employer’s contribution in the CTC; setting is enabled or not; if user wants to change it, click on the checkbox to enable/disable |
Apply the required changes and click on Save.