The process to update existing Offer details is as follows:
Navigation: Menu > Offers App > Listview > Select the Offer > Edit (Pencil Icon)
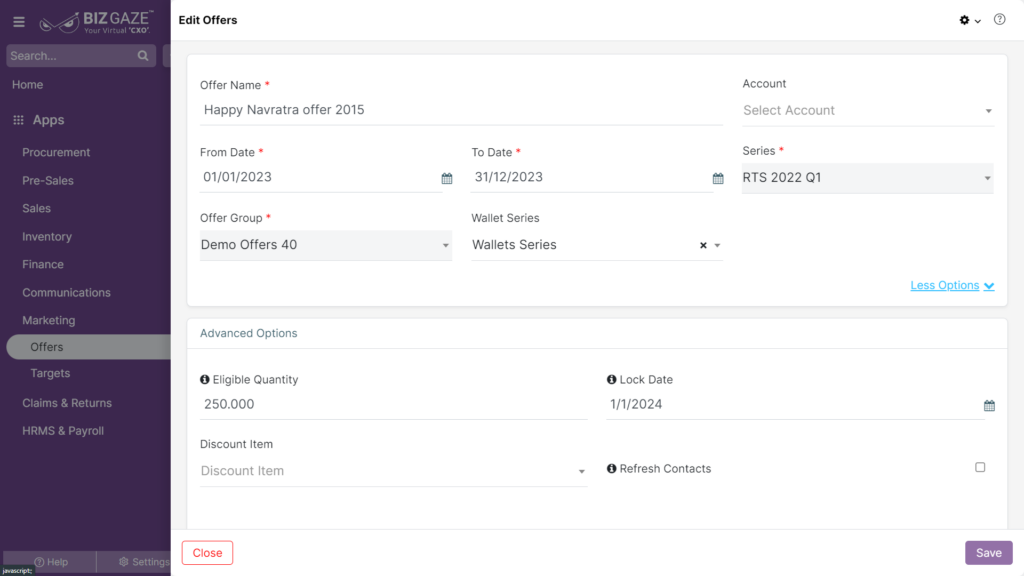
If user wants to update the already existing Offer details, user needs to click on ‘Edit’ option at the top right corner and fill in the required details
Edit Offers
| Field name | Description |
| Offer name | The system automatically shows the Offer name by default; if the user wants to change the Offer name, enter a new Offer name in the field |
| Account | The system automatically shows the account name by default; if the user wants to change the account name, select an account from the list |
| From date | The system automatically shows the From Date of the Offer by default; if the user wants to change the date, set a new date from the calendar |
| To date | The system automatically shows the To Date of the Offer by default; if the user wants to change the date, set a new date from the calendar |
| Series | The system automatically takes the Series as Offers by default |
| Offer group | The system automatically takes the Offer group name by default |
| Wallet Series | The system automatically shows the Wallet Series of the Offer by default; if the user wants to change it, select a Wallet series name from the list |
More options: User can click on ‘More options’ for Advanced Options and fill in the required changes.
| Eligible quantity | The system automatically shows the Eligible quantity of Offer items by default; if the user wants to change it, enter the value of quantity in the field |
| Lock date | If only ‘Is end date undefined’ toggle is disabled, user can change/set a Lock date from the the calendar |
| Refresh contacts | The system automatically shows whether refresh contacts option is opted or not; if the user wants to change it, select by clicking on the checkbox |
| Discount Item | The system automatically shows the discount item of the Offer by default; if the user wants to change it, select a item name from the list |
| Is end date undefined | The system automatically shows whether or not the end date is undefined, if the user wants to change it, click on the Toggle. Toggle turns to Green color when enabled and Red in color when disabled. |
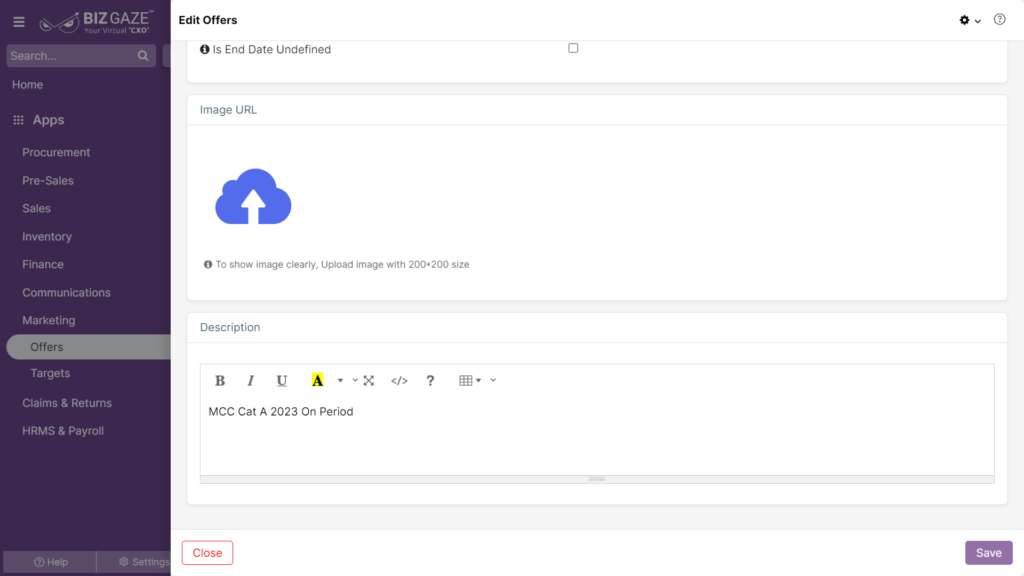
| Image | The system automatically shows an image for reference of the Offer; if the user wants to change it, choose an image from the local storage and upload |
| Description | User can comment or write a short notes about the Offer |
Updates in Details Portlet
The process to update existing Plan details is as follows:
Navigation: Menu > Offers App > Listview > Select the Offer > Details Portlet > Plans Widget > Select the Plan > Edit (Three dots)
User can click on “+” button in Plans Widget to Create a new Plan & it shows the labels of Offer Plan. Fill the required fields & click on Save.
Edit Plan
By default system shows the Plan details and If user wants to update the existing Offer Plan details, click on ‘Edit(Three Dots)’ option to the right corner of Plans Widget and fill in the required details
| Field name | Description |
| Plan name | By default the system shows the Plan name; if the user wants to change the Plan name, enter a new Plan name in the field |
| Prev. plans | By default the system shows the Previous Plan name; if the user wants to change the Plan name, Select a Previous Plan name from the list |
| Description | User can comment or enter short notes about the Plan |
| More options | User can click on ‘More options’ for Advanced Options and fill in the required changes |
| Eligible qty | By default the system shows the Eligible quantity of Plan items; if the user wants to change it, enter a new quantity value in the field. |
| Click on the toggle to apply dates to the plan. | |
| Is Plan Dates |
The system automatically shows whether or not the ‘Is Plan dates’ option is enabled or not, if the user wants to change it, click on the Toggle. Toggle turns to Green color when enabled and Red in color when disabled. If user enables the Toggle select From and To dates: From Date : Select the start date of the Offer plan from the calendar To date : Select the end date or last date of the Offer plan from the calendar |
| Plan Items | |
| Included Tags | The system automatically shows Included Tags of the Plan items; if the user wants to change it, select the Items based on the Tags from the list. (User can also add multiple Tags in the Plan) |
| Excluded Tags | The system automatically shows Excluded Tags of the Plan items; if the user wants to change it, select the Items based on the Tags from the list. (User can also add multiple Tags in the Plan) |
Apply the required changes and click on Save.
Update Plan Items:
The process to update existing Plan Items details is as follows:
Navigation: Menu > Offers App > Listview > Select the Offer > Details Portlet > Plan Items Widget > Select the Plan Item > Edit (Three dots)
User can click on “+” button in Plan Items Widget to Add Plan Items & it shows the labels of Plan Items. Fill the required fields & click on Save.
Edit Plan Items
By default system shows the Plan Items details and If user wants to update the existing Offer Plan Items details, click on ‘Edit(Three Dots)’ option to the right corner of Plan Items Widget and fill in the required details
| Field name | Description |
| Plan name | The system automatically shows the existing Plan name; if the user wants to change it, select the new plan name from the list |
| Item name /SKU | The system automatically shows the existing Plan Item name; if the user wants to change it, select the new plan items from the list |
| Points | The system automatically shows the existing points for the plan items; if the user wants to change it, enter the new value of points for the Plan items |
Apply the required changes and click on Save.
Update Plan Incentive:
The process to update existing Plan Incentive details is as follows:
Navigation: Menu > Offers App > Listview > Select the Offer > Details Portlet > Plan Incentive Widget > Select the Plan Incentive > Edit (Three dots)
User can click on “+” button in Plan Items Widget to create Plan Incentive & it shows the labels of Plan Incentive. Fill the required fields & click on Save.
Edit Plan Incentive
By default system shows the Plan Incentive details and If user wants to update the existing Offer Plan Incentive details, click on ‘Edit(Three Dots)’ option to the right corner of Plan Incentive Widget and fill in the required details
| Field name | Description |
| Plan name | The system automatically shows the existing Plan name; if the user wants to change it, select the new plan name from the list |
| Incentive name | The system automatically shows the existing Plan Incentive name; if the user wants to change it, enter the new Plan Incentive name in the field |
| Volume / value | The system automatically shows the existing Volume/Value of the Incentive Item; if the user wants to change it, enter the required volume/value of the incentive in the field |
| Discount type | The system automatically shows the existing discount type; if the user wants to change it, select a new discount type from the list |
| Discount per unit | The system automatically shows the existing discount per unit item; if the user wants to change it, enter a new discount value for the incentive item |
Apply the required changes and click on Save.
Update Plan Status:
The process to update existing Plan status is as follows:
Navigation: Menu > Offers App > Listview > Select the Offer > Details Portlet > Plan Status Widget > Click on the Toggle
By default system shows the Plan status like the Plan is active or not and If user wants to update the existing status of a particular plan, click on Toggle to Enable/Disable. Toggle turns to green in color when enabled and red in color when disabled.
User can also click on ‘Active Plans’ option and select ‘Yes’ on the pop-up notification to change all the plans to Active Status.
User can also click on ‘In-Active Plans’ option and select ‘Yes’ on the pop-up notification to change all the plans to Inactive Status.
Update FoC Items:
The process to update existing FoC Items details is as follows:
Navigation: Menu > Offers App > Listview > Select the Offer > Details Portlet > FoC Items Widget > Select the FoC Item > Edit (Three dots)
User can click on “+” button in FoC Items Widget to Add FoC Items & it shows the labels of Add FoC Items. Fill the required fields & click on Save.
Edit FoC Items
By default system shows the FoC Items details and If user wants to update the existing FoC Items details, click on ‘Edit(Three Dots)’ option to the right corner of FoC Items Widget and fill in the required details
| Field name | Description |
| FoC item | The system automatically shows the existing FoC item name; if the user wants to change it, select a new FoC item name from the list |
| For every | The system automatically shows the existing FoC items offered for every minimum quantity of items ordered; if the user wants to change it, enter the item quantity in number, so that, for every minimum quantity of items ordered, the FoC item is offered |
| FoC | The system automatically shows the existing FoC items offered for every minimum quantity of items ordered; if the user wants to change it, enter the required FoC item quantity in number to be offered |
| Additional Discount (%) | The system automatically shows the existing discount offered on the FoC item; if the user wants to change it, enter the required discount percent on the FoC Items |
Apply the required changes and click on Save.
Updates in Contacts Portlet
Update Included Contacts:
The process to Edit existing Included Contacts details is as follows:
Navigation: Menu > Offers App > Listview > Select the Offer > Contacts Portlet > Included Contacts Widget > Select the Contact > Edit (Three dots)
User can click on “+” button in Included Contacts Widget to Add Included Contacts & it shows the labels of Included Contacts fields. Fill the required fields & click on Save.
Edit Included Contacts
By default system shows the Included Contacts details and If user wants to update the existing Included Contacts details, click on ‘Edit(Three Dots)’ option to the right corner of Included Contacts Widget and fill in the required details
| Field name | Description |
| From date | The system automatically shows the existing From date of the Included item; if the user wants to change it, set a new ‘From date’ from the calendar |
| To date | The system automatically shows the existing To date of the Included item; if the user wants to change it, set a new ‘To date’ from the calendar |
| Additional amount | The system automatically shows the existing additional amount of the Included item; if the user wants to change it, enter a value of amount in the field |
Apply the required changes and click on Save.
Update Offer Contacts:
The process to Edit existing Contacts Tags details is as follows:
Navigation: Menu > Offers App > Listview > Select the Offer > Contacts Portlet > Offer Contacts Widget > Edit (Pencil Icon)
Edit Contact Tags
By default system shows the Offer Contacts Tags details and If user wants to update the existing Contacts Tags details, click on ‘Edit(Pencil Icon)’ option to the right corner of Offer Contacts Widget and fill in the required details
| Field name | Description |
| Included Tags | The system automatically shows the existing Included tags; if the user wants to change it, select the new Tag(s) to include in the offer from the list. (User can add multiple tags from the list) |
| Excluded tags | The system automatically shows the existing Excluded tags; if the user wants to change it, select the new Tag(s) to exclude from the offer from the list. (User can add multiple tags from the list) |
Apply the required changes and click on Save.