The process to update existing Vendor details is as follows:
Navigation: Menu > Vendors App > Listview > Select the Vendor > Edit (Pencil Icon)
If user wants to update the already existing Vendor details, user needs to click on ‘Edit’ option at the top right corner and fill in the required details
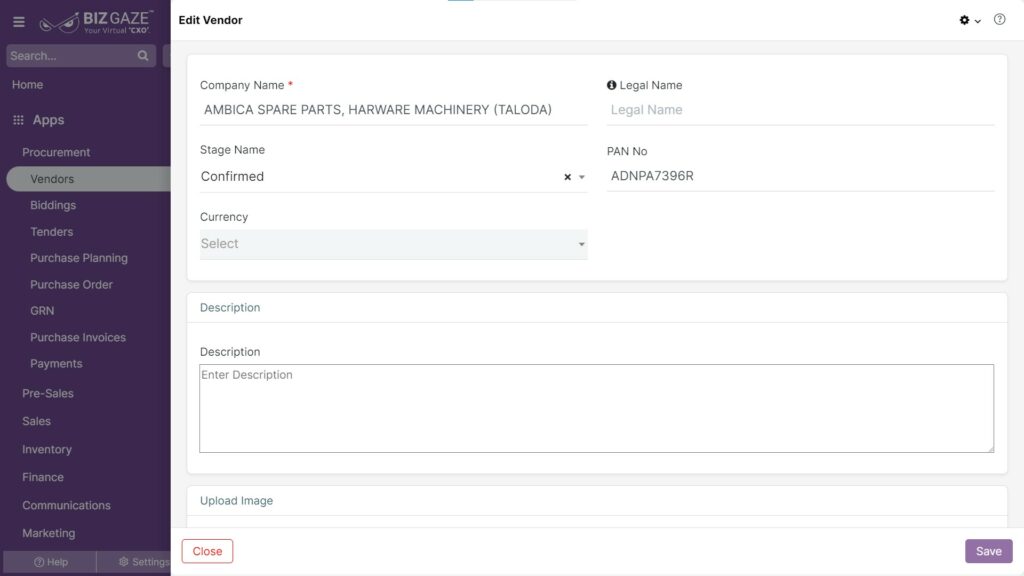
Edit Vendor
| Field name | Description |
| Company name | System automatically shows company name by default, if user wants to change company name enter a new company name in the field |
| Stage name | By default system shows current stage of the Vendor or if user wants to change the Vendor stage, select stage name for the Vendor from the drop-down list. |
| Legal name | If user wants to change legal name of the company that should reflect in the print, enter a new name in the field |
| PAN no. | By default system shows PAN number of the Vendor or if user wants to change PAN number, enter a new PAN number |
| Credit Limit Details | |
| Credit Limit Type | Automation: The system automatically sets the credit limit for the Vendor based on their tag assigned, and if user wants to set credit limit click on the Manual option.
Manual: By clicking on the manual, the user can set the credit limit manually for the Vendor. |
| Description | User can comment or enter short notes about the Vendor |
| Image URL | System already contains company image provided by the user while creating Vendor, or if user wants to change or add new image, click on Choose image and upload image from the local storage |
Apply all the required changes in the fields and click on Save.
Updates in Overview Portlet:
The process to update Ledger account name in Ledger Report Widget is as follows:
Navigation: Menu > Vendors App > Listview > Select the required Vendor name > Overview Portlet > Ledger Report Widget > Edit (Click on Ledger name )
By default system displays Ledger details that are provided while creation of the Vendor. If user wants to change Ledger name, click on the Ledger name shown and it directs to the Ledgers Module where user can update Ledger account details.
The process to update Vendor’s invoice details in Pending Invoices Widget is as follows:
Navigation: Menu > Vendors App > Listview > Select the required Vendor name > Overview Portlet > Pending Invoices Widget > Edit (Click on Invoice number)
By default system displays Pending Invoice details that are provided while creation of the Vendor. If user wants to change Invoice details, click on the Invoice number shown and it directs to the Purchase Invoice Module where user can update Pending Invoice details of the Vendor.
Updates in Details Portlet
The process to update Organization type and SPoC name in Details Widget is as follows:
Navigation: Menu > Vendors App > Listview > Select the required Vendor name > Details Portlet > Organization Details Widget > Edit (Pencil icon)
By default system displays organization details that are provided while creation of the Vendor. If user wants to change Organization type, click on the Edit option (Pencil Icon) at the top right corner of Details Widget
Edit Organization type
| Field Name | Description |
| Organization type | By default system shows organization type and if user wants to change organization type, select from the list of Organization or Walk-in and click on Save |
| Contact name | By default system displays point of contact person’s details that are provided while creation of the Vendor. If user wants to change it, click on the Point of contact name shown and it directs to the Phone book Module where user can update Point of Contact details of the Vendor. |
The process to update LoB (Line of Business) is as follows:
Navigation: Menu > Vendor App > Listview > Select the required Vendor name > Details Portlet > LoB Widget > Edit (+)
LoB Wise Tags (Line of Business)
User can click on “+” button in LoB Widget to add new LoB segment & it shows the labels of LoB segments. User can select by clicking on the required LoB checkbox.
By default system displays LoB segment details of the Vendor and if user wants to update already existing LoB wise Tag of the Vendor, click on Create(+) option at the top right corner of LoB widget and apply the details required
| Field name | Description |
| LoB | By default system shows LoB segment of the Vendor and if user wants to change the existing LoB segment, click on the checkbox to select |
| Segment | By default system shows segment name of the LoB and if user wants to change the segment manually, click on the Edit option (Pencil icon) and select a new segment name from the list |
| Contact type | System automatically loads contact type |
Apply the required details and click on Save.
The process to update existing Rule details is as follows:
Navigation: Menu > Vendor App > Listview > Select the required Vendor name > Details Portlet > Rules Widget > Edit (+)
User can click on “+” button in Rules Widget to add a new Rule & it shows the labels of Rules. Fill the required fields & Save.
System displays already existing Rule details of the Vendor and if user wants to update the Rule details, click on Edit option (Horizontal Three dots) at the top right corner of the Rules Widget.
Manual Payment and Price Code
| Field name | Description |
| LoB | System loads and displays the existing LoB segment |
| Manual payment term over ride | System loads and displays the existing payment term, and if user wants to change the Payment term configured for the Vendor, click on the checkbox and select the Payment term from the list |
| Manual Price code Over ride | System loads and displays the existing Price code, and if user wants to change the Price code configured for the Vendor, click on the checkbox and select the Price code from the list |
Apply the details and click on Save.
The process to add new documents is as follows:
Navigation: Menu > Vendor App > Listview > Select the required Vendor name > Details portlet > Documents Widget > Edit
System displays already existing document details of the Vendor and if user wants to add new documents, click on Create (Pencil Icon) option at the top right corner of the Documents Widget.
Add Documents
User can click on Create (Plus +) symbol to upload files from local storage.
User can add Vendor documents like PAN, address proofs, Aadhar card, organization related files and images. Upload the image and then click on Save.
The process to update Organization Group is as follows:
Navigation: Menu > Vendor App > Listview > Select the required Vendor name > Details Portlet > Organization Group Widget > Edit (Pencil Icon)
System displays Organization Group details of the Vendor and if user wants to update the already existing Organization Group details, user needs to click on ‘Edit’ option (Pencil icon) at the top right corner of the Organization group widget and fill in the required details
Organization Group Change
| Field name | Description |
| Group | System shows group name by default, and if user wants to change group name select organization group name from the list |
| Stage | By default system shows stage name, and if user wants to change the existing stage, select stage name from the list |
| CIN | By default system displays CIN code of the Vendor, and if user wants to change the existing CIN or add a new CIN code, enter a CIN number in the field |
Apply the details and click on Save.
The process to update GST details is as follows:
Navigation: Menu > Vendors App > Listview > Select the required Vendor name > Details portlet > GST details Widget > Edit (Three dots)
User can click on “+” button in GST Details Widget to add new details & shows the labels of it. Fill the required fields & Save.
By default system shows existing GST details of the Vendor and if user wants to add new GST details, click on Edit option at the top right corner of the GST details widget.
Update GSTIN
| Field name | Description |
| GSTIN no. | By default system shows the GST number and if user wants to change it, enter GST number of the Vendor |
| GST valid from date | By default system shows the GST validity and if user wants to change it, set GST from date of the validity from the calendar |
| GST valid to date | By default system shows the GST validity and if user wants to change it, set GST To date of the validity from the calendar |
| Address name | By default system shows the address name and if user wants to change it, select address name from the list |
Apply the required details and click on Save
The process to update existing Account Manager details is as follows:
Navigation: Menu > Vendor App > Listview > Select the required Vendor name > Details portlet > Sales Manager Widget > Edit (Horizontal Three dots)
User can click on “+” button in Account Manager Widget to add a new Account Manager & shows the labels of Account Manager details. Fill the required fields & Save.
System displays already existing Account Manager details and if user wants to update the already existing Account Manager details, click on Edit option (Horizontal Three dots) at the right corner of the Account Manager Widget.
Edit Account Manager (Vendors)
| Field name | Description |
| Employees | By default system shows Account manager name and if user wants to change existing Account manager, select a new Account Manager name from the list |
| Address | By default system takes address name and if user wants to change existing address of the Account Manager, select new address name from the list |
| Contact person | System automatically shows SPoC name (Single point of contact name) and if user wants to change contact name, select contact point person’s name from the list |
Apply the details and click on Save.
The process to add or change the existing Followers details is as follows:
Navigation: Menu > Vendors App > Listview > Select the required Vendor name > Details Portlet > Followers Widget > Edit
User can add the Multiple Followers to the Vendor, by clicking on Add option. User can click on “+” button in Followers Widget to add new Followers & shows the labels. Fill the required fields & Save.
By default system shows existing Followers name(s) of the Vendor and if user wants to change the Followers, click on Edit(Three dots) at the right corner of the Followers Widget.
Add Followers
| Field name | Description |
| Follower name | By default system shows the existing Followers’ name, if user wants to change the existing followers name, select from the list |
Apply the details and click on Save.
Delete Followers
| Field name | Description |
| Follower name | By default the system shows existing Followers’ name, if user wants to delete the follower, click on the horizontal three dots and select ‘Delete’ option. |
Updates in Contacts Portlet
The process to update Contact Point details is as follows:
Navigation: Menu > Vendors App > Listview > Select the required Vendor name > Contacts Portlet > Contact Point Widget > Edit (Three dots)
User can click on “+” button in Contact Point Widget to add a new Contact Point & it shows the labels of Contact Point details. Fill the required fields & Save.
By default system shows existing Contact Point details of the Vendor and if user wants to change the existing details, click on Edit(Three dots) option at the right corner of the Contact Point details widget.
Edit Contact Point
| Field name | Description |
| Name | By default system shows the existing Point of contact name and if user wants to change the existing name, enter a new name |
| Designation | By default system shows the existing designation and if user wants to change it, select a designation from the list |
| Phone number | By default system shows the existing Phone number of the Point of contact person and if user wants to change the number, enter a new number |
| By default system shows the existing Email Id of the Point of contact person and if user wants to change the existing mail, enter a new Mail Id | |
| Branch | By default system shows the existing branch name and if user wants to change it, select a branch name from the list. |
Apply all the details and click on Save.
The process to update the address is as follows:
Navigation: Menu > Vendor App > Listview > Select the required Vendor name > Contacts Portlet > Address Widget > Edit (Three dots)
User can click on “+” button in Address widget to add new address & shows the labels of address details. User can add Multiple addresses if the Vendor locations are different. Address can also be updated if it was overlooked while Vendor creation process.
Edit Address
| Field name | Description |
| Address name | By default system shows the existing address name and if user wants to change the existing address name, enter a new address name |
| Pin code | By default system shows the existing Pin code of the address and if user wants to change the Pin code, enter the new Pin code of the address |
| Address line 1 | By default system shows the existing address line 1 details and if user wants to change the existing address line 1, enter the address line 1 details |
| Address line 2 | By default system shows the existing address line 2 details and if user wants to change the existing address line 2, enter a new address line 2 details |
| City | By default system shows the existing city name and if user wants to change the city name, enter a new city name |
| Landmark | System automatically shows existing landmark and if user wants to change the landmark, enter a new landmark name |
| GSTIN no. | System automatically shows existing GST details and if user wants to change the GST no, enter a new GST number |
| Is cash customer? | Click on the toggle to enable user as a cash customer. A cash customer is one who pays the amount via cash mode. (Toggle turns to Green in color when selected) |
| Capture GPS coordinates | User can click on the Circle box to enable the permission of GPS coordinates. |
Apply all the details and click on Save
The process to change the existing Geo Tagging details is as follows:
Navigation: Menu > Vendor App > Listview > Select the required Vendor name > Contacts Portlet > Address Widget > Geo Tagging Widget > Edit(Three dots)
User can click on the Edit option (Three dots) to the right of Address Widget in Contacts Portlet and select by clicking on Geo Tagging option.
This feature allows user to add a Geo tagging location of the Vendor by saving GPS location, enabling the user to track the Vendor location easily. If user wants to enable Geo tagging feature, click on Save and it reflects in the Address Widget.
The process to change existing Contact Alias details is as follows:
Navigation: Menu > Vendor App > Listview > Select the required Vendor name > Contacts Portlet > Contact Alias Widget > Edit(Three dots)
User can click on “+” button in Contact Alias Widget to add new Contact Alias & shows the labels of Contact Alias details. Fill the required fields & Save.
By default system shows existing Contact Alias details of the Vendor and if user wants to change existing details, click on Edit(+) option at the right corner of the Contact Alias details widget.
Update Alias
| Field name | Description |
| Alias name | By default system shows the existing Alias name and if user wants to change it, user can enter a new alias name for the point of contact person |
| Alias CIN | By default system shows the existing CIN code and if user wants to change it, user needs to enter a new alias CIN code for the point of contact person |
| Description | User can comment or enter short notes about Alias details |
Apply the details and click on Save.
User can click on “+” button in Phone Number Widget to add new Phone Number & shows the labels of Phone Number details. Fill the required fields & Save.
The process to change Phone Number details is as follows:
Navigation: Menu > Vendor App > Listview > Select the required Vendor name > Contacts portlet > Phone Number Widget > Edit(Three dots)
By default system shows existing Phone Number details of the Vendor and if user wants to change Phone Number details, click on Edit option at the right corner of the Phone Number details widget.
User can also add Phone number, type of phone number and verify the registered phone number of the Vendor
Edit Phone Number
| Field name | Description |
| Number type | By default system shows the existing Phone number type and if user wants to change number type, select the number type like Personal, Office, Home, Others. |
| Phone type | By default system shows the existing Phone type and if user wants to change phone type, select the phone type as landline or mobile |
| Mobile no | By default system shows the existing Phone number and if user wants to change number, enter the Mobile number |
Click on Save and Phone number details are added.
User can click on “+” button in Email widget to add new Email & shows the labels of Email details. Fill the required fields & Save.
The process to change existing Email details is as follows:
Navigation: Menu > Vendor App > Listview > Select the required Vendor name > Contacts portlet > Email Id Widget > Edit(Three dots)
By default system shows existing Email Id of the Vendor and if user wants to change it, click on Edit option at the right corner of the Email Id widget.
Update Email
| Field name | Description |
| Email type | By default system shows the existing Email type and if user wants to change mail type, select the mail type as Work or Personal |
| By default system shows the existing Email and if user wants to change mail, enter the new mail id details |
Click on Save and Email details are added.
The process to change existing URL details is as follows:
Navigation: Menu > Vendor App > Listview > Select the required Vendor name > Contacts portlet > URL Widget > Edit (Three dots)
User can click on “+” button in URL widget to add new URL & shows the labels of URL details. Fill the required fields & Save.
By default system shows existing URL of the Vendor and if user wants to change existing details, click on Edit(Three dots) option at the right corner of the URL widget.
Update URL
| Field name | Description |
| URL type | By default system shows the existing URL type and if user wants to change the URL type, select from the list of Custom, Facebook, Google, or Twitter |
| URL | By default system shows the existing URL and if user wants to change it, enter the new URL of the Vendor |
Click on Save and URL details are added.